Friday, November 14, 2008

Publish A Book with Oprah's Help

Have you ever considered publishing:
  • A family history (a little text, lots of photos) or
  • A collection of your child’s baby pictures or
  • A hardcover of your child’s drawings or
  • A hardcover collection of student work (e.g. a hardcopy portfolio) or
  • A history of your company, department or organization with images and text?

If you’ve ever considered archiving images and text in a hardcover format that can be preserved on your bookcase, you have a chance to do so for almost free. Peter Walsh (an organization specialist; e.g., how to organize your home and your life) appeared on Oprah yesterday. As part of his appearance, SnapFish is offering a coupon (through today, Friday, November 14) which must be redeemed by Sunday November 16 that covers the production cost of an 8x11” custom cover photo book (20 pages). Check out http://www.oprah.com/slideshow/oprahshow/20081029_tows_messyhouse/7 for the details.

I’ve used other book publishers for this type of hardcover project but not SnapFish. Now’s your chance (and mine) to test them out and pay only shipping and handling.

Tuesday, October 21, 2008

Buried in Email

Remember the good old days when receiving an email message was new and exciting? It was an exhilarating experience to send and receive those instantaneous messages and we started referring insultingly to regular U.S. Post Office mail as “snail mail.” Oh, for the good ole days. The business and technology research firm Basex recently reported (in "Information Overload: We Have Met the Enemy and He Is Us") that the average employee in the United States receives 200 email messages a day. Here’s a case where you may want to strive to be “below average.”

A recent article in eschoolnews listed six techniques for handling the volume of email messages. Let me share just one: when you first arrive at work, avoid the temptation to immediately check email. Instead identify the top priority that you need to accomplish for the day and tackle it. Check email later, so you avoid using email as an excuse for postponing more pressing issues. Are you curious about the remaining suggestions? Check out: http://www.eschoolnews.com/news/top-news/index.cfm?i=55435.

Monday, October 20, 2008

In these Financial Times--Check Your Credit (Online)

You’ve probably heard numerous times that you have access to free annual credit reports from the three big credit reporting agencies (Experian, Equifax and TransUnion). What you may not know is that you can access (that is request) your credit reports from a single site: http://annualcreditreport.com. In fact, it’s better to request from the http://annualcreditreport.com site, because it’s a bit easier to get the “free” report as opposed to going down the wrong path and subscribing to credit reporting services that you may not need. The centralized site enables you to transfer seamlessly between each of the three credit reporting sites (and you do want to check all three reports) and then bounce back to the central location after requesting, viewing or ordering your reports. As you go through the process you can spend money (to get your credit score, to get credit alerts, and so on) but it’s not really necessary unless your circumstances (or curiosity) dictate the need.

When I originally requested these reports a couple years ago, I found major errors on two of the three reports. If you have grownup children and have ever cosigned a lease or loan or guaranteed a phone bill, you may find their finances still intertwined on the credit report with yours; even though they’re married and over a decade has passed. Sadly based on the changes I reported, I no longer have residences in three cities in two states; but I’m also free of multiple rent and mortgage responsibilities.

In a time when credit is tight, identify theft is a reality, and safeguarding your credit rating is crucial, it may be worth the time to request your current credit report.

Tuesday, September 23, 2008

Check Out Your Bank

With the nation’s financial crisis making headlines, it makes sense to use the technology to assist in making financial decisions. So, use your browser to visit http://www.bankrate.com/ and check out the rating for the bank, thrift or credit union where you store your money each payday.

Once you arrive at the bankrate.com site, look for the “Is Your Bank Safe” article under the Spotlight banner. The text “Safe and Sound Ratings” is a link to a page where you can start your search. First you’ll select whether you want to search banks/thrifts or credit unions. After making your choice and selecting the Next button, you’ll narrow the search by zip code, state, starting alpha character (e.g., the institution’s name) or other criteria. Follow the on-screen instructions and you’ll end up with the Safe & Sound CAEL rating (the lower the number, the better, but 1, 2 or 3 is considered good) or the Star Rating (more stars are better with 5 stars being tops) for the bank, thrift or credit union you select. See http://www.bankrate.com/brm/safesound/cael_explain.asp for more details on the rating systems.

Put technology to work on checking out your bank’s rating.

Monday, September 8, 2008

Fact Checkers

I received yet another email message from the Department of the Treasury this morning stating I have a $189.60 tax refund coming (I only need to click on a link that goes to an AOL site!). That coupled with similar messages received a month ago mean I can fill up my car this week. But I won’t really count on it.

There are two sites that have been very handy lately. Both enable me to check the facts. The first is www.snopes.com where I often check various email “facts” such as:
  • Presidential candidate Barack Obama is a “radical Muslim” (false),
  • Presidential candidate John McCain declared during a 60 Minutes interview that he was a “war criminal” who “bombed innocent women and children” (false),
  • The USS New York was made using steel from the World Trade Center (true),
  • You can cook an egg or popcorn if placed between two activated cell phones (false), and
  • That an email greeting card from a family member may include a malicious virus (true, but generally only unpatched Windows-based systems are vulnerable and to infect your system you must click a link that goes to server with malware). Note, always hover over any link in any message and if the web address displayed on your status bar is inconsistent with a real online greeting card site (such as www.hallmark.com or www.egreetings.com or www.bluemountain.com) or the site you expect the link to go to, don’t go there.

The other site I use to check facts is http://www.factcheck.org/. The site is a project of the Annenberg Public Policy Center of the University of Pennsylvania and identifies itself as “a nonpartisan, nonprofit, ‘consumer advocate’ for voters that aims to reduce the level of deception and confusion in U.S. politics.” The Annenberg Political Fact Check monitors “the factual accuracy of what is said by major U.S. political players in the form of TV ads, debates, speeches, interviews, and news releases.” Their goal “is to apply the best practices of both journalism and scholarship, and to increase public knowledge and understanding.”

So check your facts…before you pass them on.

Tuesday, September 2, 2008

Microsoft Office Help

Microsoft publishes an online newsletter (the Microsoft Office Insider) with tips, news, latest support articles, templates and clip art. To subscribe, check out http://office.microsoft.com/en-us/help/HA101864261033.aspx. As an example, the August issue includes the following tip:

Do you e-mail documents to yourself or others?
There's a new development that's faster and easier. Download this plug-in for Microsoft Office Word, Excel, and PowerPoint and save documents to a free Workspace on the web. Access, view, and share documents with the people you invite - anytime! Here's the free plug-in. http://go.microsoft.com/?linkid=9382158. What's a Workspace? http://go.microsoft.com/?linkid=9382159.

Saturday, August 23, 2008

"Virtual" Student Response Systems

Yesterday’s tip talked about clickers in the classroom (see http://technotipster.blogspot.com/2008/08/clickers-in-classroom.html) and mentioned ResponseWare Web. That’s a “revolutionary” new response system that enables classroom or audience participants to engage in polling using a mobile device (PDA, cell phone), laptop, desktop or handheld clicker from TurningPoint Technologies. “As a web-based polling application, ResponseWare Web allows participants to submit responses via any device with access to the internet and immediately transfers results to TurningPoint's interactive polling slides” (see http://www.turningtechnologies.com/governmentnonprofitinteractivepresentation/governmentresponsewareweb.cfm).

It’s important to note that you can “mix and match” response devices. Whether participants are students in a classroom, committee members in a face-to-face meeting or remote conferees (connected via a webinar session or conference call); the presenter, chair or speaker can gather anonymous feedback from participants:
  • If responders are using a device that connects to the web (cell phone, PDA, laptop), either in the meeting or remotely or
  • If responders are using a TurningPoint clicker (either RF or XR) and located in the same location as the speaker (within range of the TurningPoint access point).

“Without using their voices” this product enables anonymous audience participation. After allowing a period for polling, the speaker, instructor, chair, or facilitator can display a graph of the polling results with percentages or counts using TurningPoint 2008 (works with PowerPoint) or TurningPoint Anywhere 2008 (works as an overlay with any application or web page).

Response devices that can be used instead of a handheld clicker include the Apple® iPhone™, a Blackberry®, a smartphone using Windows Mobile 5.0 or above, or any laptop or standard computer with wired or wireless access to the Web.

Using this technology, you can move along the agenda and gather feedback whether your “audience” is face-to-face or in remote sites; e.g., students in classrooms, students in distance learning courses, committee members teleconferencing from remote sites, and so on.

Thursday, August 21, 2008

Clickers in the Classroom

Student response systems (affectionately called clickers) are being integrated into instruction at both the high school and college level. This semester, we have over 20 faculty members at JCCC using the TurningPoint clicker system. TurningPoint Technologies offers three different applications for use with their clicker system: TurningPoint 2008 (which works hand-in-hand with PowerPoint to add special interactive slides with questions and then displays the responses received from students in graph form), TurningPoint Anywhere 2008 (which overlays any computer application and can be used to poll, survey, collect and display student responses; e.g., you can use the overlay on top of a screen displaying a Word document, a web site, an Excel document, or literally any application), and ResponseWare Web (which collects student responses using a web site; that is, it can be used in a classroom where all students have access to a computer or it can be used when students have their own wireless laptop or cell phone with Internet access). ResponseWare Web can also be used with distance learning students, since only web access is required…no student clicker is needed..

If you’re one of those faculty members using TurningPoint, one of the first lessons we try to teach is that after installing the software, users should set the default option for the TurningPoint 2008 add-in to always appear in PowerPoint. If you do so, you don’t need to open TurningPoint 2008 and then open a PowerPoint slideshow. With the option set, you can simply open PowerPoint and the TurningPoint 2008 add-in is loaded automatically and available. To turn on this setting:

  1. Open TurningPoint 2008.
  2. Select the TurningPoint tab (in Office 2007 version).
  3. Select the Tools > Settings command.
  4. In the Presentation settings (select in the left panel), under the Misc section (you’ll need to scroll down in the right panel), change the value for “Add-In always loaded” to True (click on the word False and use the drop-down to select True).
  5. Click Done (bottom of window).

You only have to do this once and then TurningPoint will always be loaded when you start PowerPoint. Then you can dispense with the TurningPoint desktop shortcut if you wish.

Wednesday, August 20, 2008

Sharing & Finding PowerPoint Slideshows

A basic premise of Web 2.0 is that users collaborate, publish and share digital resources. Slideshare qualifies because it is a repository of PowerPoint slideshows that are contributed by the creators, can be viewed, downloaded and used by others (as always giving credit is both neighborly, judicious and appropriate). http://www.slideshare.net/ is a searchable archive of slideshows covering topics from Aljazeera to the Olympics to Zoology and everything inbetween. Visit the site, use the search box to enter a keyword (“copyright,” “web 2.0,” “conflict management,” or whatever) for the topic you’re researching and you’ll (probably) find a host of slideshows.

Once you locate the topic you seek, you can view the slideshow (clicking through a page at a time), display it full screen, download it, and leave comments (or view the comments of others). If you create an account and log-in, you can upload your own slideshows (if you want to share them; in PDF, PPT, PPS, POT, ODP or keynote format), locate and download presentations (if the creator enables the download), embed slideshows in a blog or website, and create a slidecast by linking your slides to an audio track. You can also enroll in a “group” and receive email alerts when anyone posts a slideshow or message related to that topic.

To check out a couple slideshows I’ve posted on “Web 2.0” and “copyright,” see http://www.slideshare.net/jbacon.

Tuesday, August 19, 2008

Mind-Mapping & Web 2.0

What tools are available for instructors to develop instructional materials or for use in instruction? How do you locate one of the plethora of Web 2.0 apps that meet your instructional or course development needs? To address that issue, I populated a mind map for "The Instructor's Digital Toolkit: A Show & Tell Session," a presentation for the Kansas City Professional Development Council Conference at Ottawa University last March 1, 2008. Then I updated the mind map for use at a similar presentation for the Summer Institute on Distance Learning and Instructional Technology (SIDLIT) held at JCCC on July 31 and August 1, 2008.
Specifically, the mind map is but a single example of what can be accomplished using a tool like Mindomo. Mind mapping can be used:
  • To document classroom brainstorming sessions,
  • To develop a timeline,
  • To organize tasks,
  • To flowchart processes,
  • To cluster ideas,
  • To present information in a classroom or for a presentation (instead of using a PowerPoint slideshow).

In the example at http://www.mindomo.com/view?m=38c41ea842988eb5177861fc90f77e46, Mindomo has been used to categorize and document a host of Web 2.0 applications (plus some desktop apps that might be useful for online and classroom instructors).

When using the mind map, hover your mouse pointer over each note icon to see related text, click the globe icon to jump to the website for the specified application, click the "+" sign to expand and display subtopics or (if visible) click the "-" sign to contract and hide subtopics.

How would you use this web 2.0 tool?

Monday, August 18, 2008

Web 2.0 and What It Really Means

From Wikipedia (commonly considered a prime example of a Web 2.0 application), Web 2.0 is defined as: “ the trend in the use of World Wide Web technology and web design that aims to enhance creativity, information sharing, and, most notably, collaboration among users. These concepts have led to the development and evolution of web-based communities and hosted services, such as social-networking sites, wikis, blogs, and folksonomies. The term became notable after the first O'Reilly Media Web 2.0 conference in 2004. Although the term suggests a new version of the World Wide Web, it does not refer to an update to any technical specifications, but to changes in the ways software developers and end-users utilize the Web.”

And what does that mean? The British Guardian newspaper further describes Web 2.0 as “an idea in people's heads rather than a reality. It’s actually an idea that the reciprocity between the user and the provider is what's emphasised. In other words, genuine interactivity, if you like, simply because people can upload as well as download.”

Web 2.0 is really a concept that identifies tools which:
  1. Use the Internet as their platform (e.g., the application resides on the web and not necessarily on your desktop),
  2. Enable web authors (e.g., publishers) and web users (e.g., readers) to easily collaborate and co-publish, and
  3. Breaks down the barriers between publishers and readers (e.g., we all become publishers, contributors, editors and readers).

The best definition of Web 2.0 can be obtained by seeing “it” in action. So, let’s suppose you are one of thousands of individuals who take digital images of “places” you’ve visited. You can share those images with anyone or a select group of friends. That’s basically what Flickr, Picassa and other Web 2.0 photo sharing sites enable you to do. But let’s take it a step further. Suppose you want to see not just a 2D photographic image of a landmark, historic site or location, but also want to “contribute” toward a virtual 3D view of that “place.” That’s what Microsoft Photosynth does. It takes hundreds if not thousands of images, aligns and synchronizes them so that users can see the combined photographic contributions of “the many” in order to view a “unified 3D version” of the image. To quote Microsoft’s site at http://labs.live.com/photosynth/, “what if your photo collection was an entry point into the world, like a wormhole that you could jump through and explore?”

The following video was presented at SIGGRAPH to demonstrate what the university of Washington and Microsoft Research have been able to accomplish using this tool. Check out http://phototour.cs.washington.edu/findingpaths/.

Now that’s Web 2.0. It’s collaborative, utilizes the best work of all contributors, while breaking down the artificial barriers between publisher, editor, artist, contributor, and reader…and make us all..all of the above. Tomorrow, we’ll talk about yet another Web 2.0 tool and how it can be used in instruction.

Wednesday, July 30, 2008

Your Digital Toolkit: Lesser Known Web 2.0 & Desktop Apps

The Summer Institute on Distance Learning and Instructional Technology (SIDLIT, pronounced "sidelight") returns to Johnson County Community College on Thursday and Friday, July 31 and August 1, 2008 with over 380 attendees registered. The conference, in it's 9th year, is sponsored by Colleague to Colleague and includes sessions on topics from ANGEL to blogs and wikis.

One of my sessions (on Friday, August 1st) covers "Your Digital Toolkit: Lesser Known Web 2.0 & Desktop Apps." It's described in this way: "If you've heard about Web 2.0, you've heard about blogs, wikis and social networks. But what web 2.0 tools are available for your digital toolkit beyond the basics? This session begins with a quick survey of Web 2.0, desktop and rich Internet applications (RIAs) that may be useful for personal and instructional purposes (both classroom and online)."

The handout for the session is this blog entry and includes a del.icio.us link to each of the web 2.0 tools and desktop apps that I'll discuss. The list of tagged items is available at http://delicious.com/jbacon/SIDLIT2008?sort=alpha&order=asc.

To be sure everyone understands the language, I'll begin with a brief explanation of the differences between web 1.0 and web 2.0. My definition will focus on the following basic comparison.

Web 1.0 to Web 2.0 represents a shift:
  1. From personal bookmarking to shared tagging,
  2. From permissions, centralized security and control to radical trust, every person involvement and decentralization,
  3. From text & graphics to media rich, participatory, web experiences,
  4. From versions and scheduled releases to continuous improvement where products are always in beta,
  5. From static web publishing with limited, restricted roles to dynamic, interactive participation where everyone's an author, contributor, editor, reviewer and owner using rich Internet tools (RIAs) available to everyone, anytime, online.

The tools I'll discuss are in the del.icio.us list (link above) but I've linked to a few specific examples of content created using these tools (below).

Finally, to keep up on Web 2.0 news, I subscribe to http://news.cnet.com/webware/ (RSS feed, email, lots of options). Good place to get news on new apps, losers and winners.

Monday, July 7, 2008

Splitting Worksheet Windows

The question came up recently “How do you split the window in Excel so you can see a spreadsheet (usually referred to as a worksheet) in two different windows.” There are several answers depending on your needs.

  1. After loading a document (workbook) in Excel 2007, go to the View tab and select the Split option. The current document window will be split and you can scroll either window (on the same document) independently of the other.
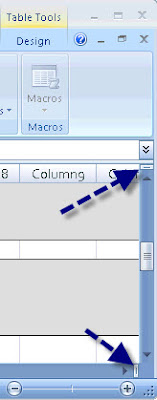
  2. Also there are splitter handles at the top of the vertical scrollbar and at the right end of the horizontal scrollbar. Click and drag one of them with the mouse and it will split the window. Again, this only lets you look at two parts of a single worksheet at one time, It won't, for instance, let you look at parts of different worksheets at the same time (whether they’re from the same Excel workbook or not).

  3. If you want separate windows showing different parts of the same workbook (including different worksheets), use the New Window button on the View tab (the third icon to the left of the Split icon on the View tab).

  4. Now if you want two instances of Excel so you can run them in separate windows and see the same or different worksheets displayed in each window, just launch Excel directly, rather than launching it by opening a file. If you use the second instance to open a file you already have open in the first instance, the access in the second instance will be read only.
Thanks to Saul Epstein, Ed Lovitt, Tracy Newman and Michael Rea who contributed to the information included in this tip.

Tuesday, July 1, 2008

Phishing Part II

One of the Ed Tech Center staff members at JCCC (Davy Jones) pointed out, after yesterday’s tip on phishing, that the IRS does have a site with instructions for helping them shut down phishing schemes at: http://www.irs.gov/newsroom/article/0,,id=155682,00.html

The instructions for submitting suspected bogus email messages are at http://www.irs.gov/privacy/article/0,,id=179820,00.html. Though they indicate you can “forward’ the email to phishing@irs.gov it’s actually better to send them an email and attach the bogus email to the message you send. This preserves the header information that enables the IRS to better follow-up and track the sender of the fraudulent message. To attach the message (using Outlook 2007) you’d:
  1. Open a new email message,
  2. Address it to phishing@irs.gov,
  3. Enter a short Subject line such as: “Possible Phishing Message,”
  4. In the text area enter a short message, if you wish,
  5. Select the Insert tab,
  6. Select the Attach Item option,
  7. When the Insert Item dialog box appears (see image below), navigate to the suspected phishing email message and,
  8. Double-click to attach it to your message. Now you’re ready to send the email message.

Monday, June 30, 2008

The Department of the Treasury Does Not Do Business This Way

At least two members of the staff at JCCC received the following email “supposedly” from the “Department of the Treasury.” The email is not from the Department of the Treasury and the senders are phishing (trying to get personal information from you in order to defraud you, see http://en.wikipedia.org/wiki/Phishing). Here are a couple of obvious clues:
  1. Hover over the Click Here link and you’ll see that the link address is an AOL (America Online) address, yet the “From” field indicates the email is from service@usa.org. Anytime there’s this type of discrepancy, be leery and assume the message is bogus.
  2. Government agencies rarely allow obvious spelling errors to enter their communications (“u” for “you”).
  3. You can spot bogus, phishing messages by their use of such phrases as “"Verify your account" (businesses should never ask you to send usernames, passwords, or confidential, personal data such as social security numbers through the mail), "If you don't respond within 48 hours, your account will be closed" (don’t fall for any type of pressure that encourages you to respond without thinking), or "Dear Valued Customer" (these messages are sent in bulk and are not personalized).

For more detail check out Microsoft’s anti-phishing site at http://www.microsoft.com/protect/yourself/phishing/identify.mspx or the University of Minnesota’s Safe Computing site at http://safecomputing.umn.edu/safepractices/phishing.html.

From: Department of the Treasury [mailto:service@usa.org] Sent: Friday, June
27, 2008 6:15 AM

Subject: Notice from Department of the Treasury

After the last annual calculations of your fiscal activity we have determined that you
are eligible to receive a tax refund under section 501(c) (3) of the Internal
Revenue Code. Tax refund value is $189.60. Please submit the tax refund request
and allow us 6-9 days in order to IWP the data received. If u don't receive your
refund within 9 business days from the original IRS mailing date shown, you can
start a refund trace online.

If you distribute funds to other organization, your records must show wether they are exempt under section 497 (c) (15). In cases where the recipient org. is not exempt under section 497 (c) (15), you must have evidence the funds will be used for section 497 (c) (15) purposes. If you distribute fund to individuals, you should keep case histories showing the recipient's name and address; the purpose of the award; the maner of section; and the realtionship of the recipient to any of your officers,
directors, trustees, members, or major contributors.

To access the form for your tax refund, please click here

This notification has been sent by the Internal Revenue Service, a bureau of the Department of the Treasury.

Sincerely Yours,
John Stewart
Director, Exempt. Organization
Rulings and Agreements Letter
Internal Revenue Service

Wednesday, June 25, 2008

Have you every scanned images or text and ended up with numerous separate Adobe PDF (portable document format) files and wanted to merge them into a single PDF file? Or have you ever had an assortment of files (images, Word documents, PDF files, and so on) and wanted to package them together? Well, you can.

Prior to Acrobat Professional 8 you could (and still can) merge a collection of PDF files into a single PDF document. To do so, you can select the Document --> Insert Pages command and in the Select File to Insert dialog box, select the filename of the PDF file from which you want to insert pages. When prompted, you can indicate if you want to insert the pages before or after a given page in the target PDF file.


When importing (combining) a large numbers of pages (over 10 or so), a problem occurs where the pages are inserted in reverse order of their file names, no matter what you do. For example, if you have scanned pages and saved them as file01, file 02, file03, and so on; they’ll be inserted in the order file30, file29, file28, and so on.

There is a better way, which also enables you to insert pages in the order you want as well as merge files that are not already in the PDF file format.

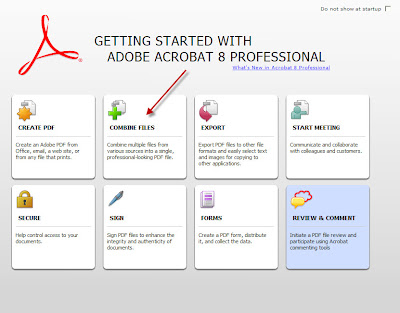
The solution is to not use the Document --> Insert Pages command but rather use the Combine Files option from the Tasks toolbar (it resides under the Menu bar and above the File toolbar and is between the Create PDF and Export buttons).


This option enables you to select from any files to which you have access (on your hard drive or a network drive) and then add (import) them in any order you specify. If the files are not already PDF files, Acrobat automatically converts them to the PDF format before merging them into the final PDF package. You can merge Word documents, Excel spreadsheets, graphic images (JPEG, GIF, PNG), as well as PDFs. You also have the option to manually rearrange the files into any order you prefer. You can also choose whether you want a combined document with each file becoming a sequential page in the PDF file or whether you want to save all files separately in a container that uses a single filename.

If you want Adobe Acrobat to walk you through the entire process, start up Adobe Acrobat Professional 8. If the Getting Started with Adobe Acrobat Professional 8 wizard is not visible automatically, select the Help --> Getting Started with Adobe Acrobat Professional 8 command. Then select the Combine Files button. You’ll arrive at the same place whether you take this route or simply select the Combine Files button on the Tasks toolbar.

Thanks to Bob Epp for providing the basic research for this tip.

Tuesday, June 24, 2008

Tired of Pre-Approved Credit Card Junk Mail?

You can go to www.optoutprescreen.com (or call 1-888-5-OPT-OUT) to help reduce the number of those pre-approved credit card junk mail letters you receive. Don’t expect overnight results, but I did this several months ago and the number of pre-approved offers has definitely diminished. Now, if we could just opt out of SPAM!

Monday, June 23, 2008

How Small Can You Make a Camcorder?

Digital Camcorders are getting smaller and the prices are dropping. That seems to be the general story of all technology. I’ve recently tested a Flip Video Ultra camcorder (see http://www.theflip.com/products.shtml) and found it wonderfully small (fits in a shirt pocket). It’s lightweight too. It records video on internal memory rather than on a miniDV tape. The Flip Video Ultra can record 60 minutes of video using 2GB of internal memory (the Ultra has 2GB while the regular Flip Video has 1GB). Note, the newest addition to the Flip Video family is a 2GB Flip Mino. It’s much like the Ultra except it includes an internal Lithium-Ion rechargeable battery capable of 4 hours recording between charges. It retails for $179.99.

I was pretty impressed with the 640x480 resolution image from the $149 camera, until I ran across the AIPTEK A-HD 720P digital camcorder (see http://www.aiptek.com/Merchant2/merchant.mvc?Screen=PROD&Product_Code=R-AHDB&Category_Code=DC1&Store_Code=AS) which retails at $159.99 (as low as $139.99 refurbished). While the A-HD 720P doesn’t have a snappy name (like Flip Video Ultra), it does provide high definition (HD) video recording (1280x720 using H.264 video compression) and is also an 8 megapixel still image camera and media player all rolled into one. The video you capture can be played on a high definition TV, standard TV, PC or Mac (cables are included) and enables you to record direct from a TV set as well. Some of the other significant differences include a rechargeable 1000mA Li-ion battery good for about 4 hours of recording (the Flip Video Ultra uses 2 AA batteries that give you approximately 2 hours of recording time) and the ability to use up to an 8GB SD card (the Flip Video Ultra’s memory is not expandable). The bad news is that the A-HD 720P does not come with an SD memory card, so you must buy one or you don’t have sufficient memory to record video (it comes with only 6MB internal memory). So effectively, the cost of the camcorder is $12 to $30 more than it seems. The following chart indicates how much video recording time or how many images you can store based on the SD card size and the resolution of the images/video you capture.


One negative to the A-HD 720P is it’s a bit heavier than the 5.2 oz Flip Video Ultra (can’t find an exact weight in the specs).

The A-HD video files are compressed (stored in the QuickTime .MOV format using H.264 video compression) while the Flip Video Ultra uses Pure Digital Video Engine 2.5 to compress in .AVI format. With both camcorders, it takes some practice to steady the camera and adjust the zoom (both units employ a 2x digital zoom).

Prices listed above are list and can be “beat” at http://www.amazon.com/ and other vendors. There are accessories available for both camcorders (tripods, and so on). Either choice is a giant step forward in miniaturization and price reduction.

Thursday, June 19, 2008

No Free Lunch @ Adobe Until July 1

Bob Epp, Sr. Analyst in the Ed Tech Center, alerted me to the fact that some of his Photoshop students wanted to download a trial version of Photoshop (typically good for 30 days) and found that the trial downloads (http://www.adobe.com/downloads/) are unavailable until July 1. This appears to be the case with allk Adobe trial downloads, not just Photoshop. Here is the explanation from Adobe:

During the month of June 2008, certain product trials that are launched for the first time (regardless of when they were installed) will function for only one day instead of 30 days, due to an error in a line of code that counts down the remaining days in a trial. You will not experience this issue if you have launched your trial before June 1, 2008, or do not launch it until July 1 or thereafter.

We understand that trials are an important tool to experience the new features of a product. However, this issue would have resulted in a frustrating situation for a large number of customers — an experience that just does not meet the high standards we have set for all of our products and solutions. We invite you to explore the other resources available on Adobe.com in order to experience the products in action.

While we’re discussing Adobe products, I mentioned Adobe Express in an earlier post. Christopher Boyce of the UMKC School of Medicine (Kansas City, MO) subsequently shared the following information with me:

I just wanted to mention a note about Photoshop Express, which you may already know - Adobe's terms of use: https://www.photoshop.com/express/terms.html

They have already revised it recently, due to negative feedback from their original terms, but there is still these particular terms which may not sit well with some users:

"8. Use of Your Content.

Adobe does not claim ownership of Your Content. However, with respect to Your Content that you submit or make available for inclusion on publicly accessible areas of the Services, and unless otherwise specifically agreed in any Additional Terms that might accompany individual services (such as Photoshop.com/Express), you grant Adobe a worldwide, royalty-free, nonexclusive, perpetual, irrevocable, and fully sublicensable license to use, distribute, reproduce, modify, adapt, publish, translate, publicly perform and publicly display such Content (in whole or in part) and to incorporate such Content into other Materials or works in any format or medium now known or later developed."

and

"10. Right to Derive Revenue/Advertisements.

You agree that Adobe may derive revenue and or other remuneration from the Services including from portions of the Services that include Your Content.
For example, Adobe may display Adobe and/or third party paid advertisements and other information adjacent to or included with the Services and adjacent to or in connection with Your Content, and you agree that you are not entitled to any compensation for any such advertisements. The manner, mode and extent of advertising or other revenue generating models by Adobe on or in conjunction with the Services are subject to change without specific notice to you."

...I just wanted to pass this along.

So, “buyer (or freebie user) beware.”

Wednesday, June 18, 2008

Information Please!

Nick Greenup, Sr. Analyst in the Ed Tech Center, recently shared this information with me. When Nick receives a new phone book, he slices out the coupon pages, staples them together and discards the rest of the book. With directory assistance and the Internet there’s no need to keep a bulky set of yellow pages around. Here are the ways Nick accesses the information he needs.

For residential, business, and "reverse" look up use: http://www.anywho.com. Reverse lookup is when you know the phone number and want to find out to whom it belongs. Try looking up your own information and you’ll see what’s available to anyone on the web. Helpful and scary.

When www.Anywho.com fails to locate a desired business or contact, try a Google Maps search (http://maps.google.com). Notice the Find Businesses tab at the top. You can be very general or specific with your search. For instance, try “colleges” in the What field and “Overland Park” in the Where field. You’ll see all the local educational options. Nick points out that you can also talk to Google Maps like a buddy instead of a computer program; e.g., type "pizza in overland park" or "lunch Westport" and you’ll see surprisingly good results including a list of findings and a map view with all contact info (often a picture or street view of the business too). You can also get driving directions using Google Maps.

Suppose you are not at your computer, then what? Call 1411 and pay up to $3.50 per call? No way! Try Goog411, by calling toll free 1-800-GOOG-411 (1-800-466-4411). Check out the YouTube video http://www.google.com/goog411/ for more details. There is no charge for the service and they will connect you to the desired number without charge too. If using a cell phone you can say "text message" and Google will text you the business details. If you have a phone with Internet access you can say map it and view a map/directions!

These options should cover all your “information” needs, but there’s still one more option. It’s not new, does include ads, but it’s also free. This company holds the patent for free ad-based 411 information. Simply call 800-Free-411. If you have a Skype account add the contact "FREE411USA" and when you call it using Skype you’ll be connected to the service. Nick also mentioned that “Microsoft and AT&T are also running a free 411, but I haven't tried them.”

Tuesday, June 17, 2008

Plethora of Web 2.0 Tools

Back in March 2008, I presented a workshop session called "The Instructor's Digital Toolkit: A Show & Tell Session" (at the Kansas City Professional Development Council Conference at Ottawa University). In the session I attempted to focus on the question “What tools are available to instructors with which to develop instructional materials or that might enhance the presentation of instructional materials?” Many of these tools (but not all) are part of the plethora of Web 2.0 applications. The selection of instructional tools is far greater than the typical blog, wiki, and social bookmarking apps that are commonly discussed. To illustrate the range of tools, I developed a mind map (http://www.mindomo.com/view?m=38c41ea842988eb5177861fc90f77e46) and included it in the presentation. The mind map has since been enlarged and I continue to add new apps as I hear about them (and have time to update the mind map).

When using the mind map, hover your mouse pointer over each note icon to see related text, click the globe icon to jump to the website for the application, click the "+" sign to expand and display subtopics or (if already displayed) click the "-" sign to contract and hide subtopics. In a few cases, you can expand the mind map beyond the listing of apps to display instructional examples. If you have comments or additions to the listings, please email me at (jbacon@jccc.edu).

It’s probably worth noting that many colleges (like JCCC where I work) offer in-house equivalents to many of these tools (e.g., Blackboard and Angel include blog and wiki tools, SharePoint is a collaboration tool), so many of these applications may not be supported by your college (or your company for that matter).

Monday, June 16, 2008

"You're Killing Me" said the Flash Drive

A number of reasons exist for flash drives (sometimes called pen drives) to go bad. Obviously, physical abuse of the flash drive, manufacturing errors and the like can contribute, but I’ve never had a flash drive fail. I suspect that one common mistake can greatly increase the chances of failure. If you do not disengage the flash drive properly it can contribute to the failure rate.

The proper procedure is to use the Windows "Safely remove hardware" process listed on the Windows task bar. The task bar icon looks link a small green arrow (pointing to the left and downward) which hovers over a gray rectangular object. If you remove your flash drive or other storage device without first using this feature and your system is writing files (temporary or otherwise) to the flash drive, you can corrupt the files being written which can subsequently cause the pen drive to fail.

Thursday, June 12, 2008

What is Web 2.0

Nowadays, you’ll frequently hear the term Web 2.0 or Web 2.0 apps (applications). It’s a term that’s several years old and refers to the second generation of the web (some say we’re already into Web 3.0 or Web 3D, but that discussion is for another day). If you’re curious, checkout a slideshow I put together last Summer for the Powerful Professional Conference hosted by Johnson County Community College available at http://www.slideshare.net/jbacon/personal-professional-uses-of-web-20-tools. The second slide says most of what you need to know.

In essence, Web 1.0 was a “one way street” (web publishers sent you information they wanted and publishing was restricted to those who knew the language (HTML) and had the tools (HTML editors, servers, access rights). Web 2.0, on the other hand, is participatory. Anyone with web access (a browser) has the ability to publish, contribute, comment and co-author. Tools such as wikis, blogs, and social networking apps are the epitome of Web 2.0. They provide for the “harnessing of collective intelligence” (e.g., we all contribute and the product is better, more accurate and more accessible because it is democratic, self-checked and above all else participatory.

Another way to summarize the shift from Web 1.0 to 2.0 is covered by slides 4-7 of the slideshow at http://www.slideshare.net/anantshri/web20-an-introduction-396686. By the way, http://www.slideshare.net/ site is another example of a Web 2.0 participatory, web-based application.

In upcoming tips, I’ll discuss Web 2.0 apps in more detail. You also have an opportunity to learn more at the upcoming Summer Institute on Distance Learning and instructional Technology (SIDLIT) hosted by the Colleague to Colleague organization and Johnson County Community College on Thursday, July 31 and Friday, August 1, 2008. For more information, a schedule of sessions and to register for the free conference, check out http://web.jccc.net/c2c/sidlit/.

Wednesday, June 4, 2008

Worldwide Telescope from Microsoft Research

I don’t pretend to be even an amateur astronomer, but found the Worldwide Telescope (WWT) released by Microsoft Research a fascinating application (see http://www.worldwidetelescope.org/experienceIt/ExperienceIt.aspx). In knowledgeable hands, it would have a clear educational use. Simply from a curiosity standpoint, it’s a fascinating tool that enables you to see black holes, colliding galaxies and the birth of new stars.

After you download the 20.2 MB installer, run the installer (instructions are available at http://www.worldwidetelescope.org/experienceIt/ExperienceIt.aspx?exp=true) and start up the application (it’ll appear on your Start menu), your next step should be to click the Guided Tours link (top left of the screen) and run the “Learning WWT” tour. It’ll give you a quick overview of how to navigate and get the most out of WWT (e.g., use your right mouse button for more information on any “heavenly body,” use the scroll wheel or Page Up and Page Down keys to zoom in or out from an image, click and drag on the star field background to change your view or use the arrow keys to navigate, and so on).

The WWT is considered a “Web 2.0 visualization software” tool that enables your computer to become a virtual telescope. It is a collaborative work because educators and scientists have compiled the images from multiple sources and created guided tools. You, in turn can collaborate, by adding your comments when you complete a tour.

In Microsoft’s verbiage, “WWT is a single rich application portal that blends terabytes of images, information, and stories from multiple sources over the Internet into a seamless, immersive, rich media experience. Kids of all ages will feel empowered to explore and understand the universe with its simple and powerful user interface. “Microsoft Research is dedicating Worldwide Telescope to the memory of Jim Gray and is releasing WWT as a free resource to the astronomy and education communities with the hope that it will inspire and empower people to explore and understand the universe like never before.”

Tuesday, June 3, 2008

SpyWare and Your Home Computer

If your home computer seems to be running slower, you're seeing pop-up windows you didn't invite and you can no longer access web sites that you previously could browse, here's a prescription for your sick computer.

  • Be sure you have a firewall installed (Windows XP Service Pack 2 includes a built-in firewall).
  • Be sure you are running anti-virus software with the most up-to-date virus definitions available.
  • Be sure you are running adware/spyware protection.

One option is Ad-aware SE Personal (free) which is designed to provide "protection from known Data-mining, aggressive advertising, Parasites, Scumware, selected traditional Trojans, Dialers, Malware, Browser hijackers, and tracking components."

To locate, go to http://www.lavasoftusa.com/software/adaware/ and click on the "Download Ad-aware here" button on the right.

Or you can find the software on http://www.download.com/ at http://www.download.com/3000-2144-10045910.html?part=69274&subj=dlpage&tag=button

Ad-aware is one of the first applications built to find and remove adware and spyware. It has the ability to scan your RAM, registry, hard drives, and external storage devices for known data-mining, advertising, and tracking components. This application cleans your system and provides a higher degree of privacy (and more efficient computing) while you surf the Web.
Ad-Aware SE Personal Edition can also scan for known and unknown/possible browser hijackers.

NOTE: Ad-aware is NOT free for commercial or business purposes.

Monday, June 2, 2008

Pop-up Blockers

If you have Microsoft Windows Service Pack 2 (SP2) installed, the service pack automatically adds a pop-up blocker (and turns it on) that can interfere with accessing certain web sites such as the Web Outlook page (owa.jccc.edu), and many web based tools such as Blackboard (either a learning managemnet system). You can turn off the pop-up blocker, using the Tools --> Pop-up Blocker --> Turn Off Pop-up Blocker command, but a better option is to leave it turned “on” and exempt certain sites.

To exempt specific sites select the Tools --> Pop-up Blocker --> Pop-up Blocker Settings command. When you select this command, you can type in the URL to exempt and click the Add button. Then click Close when done adding sites to exempt. By the way, you can also exempt sites on the fly by clicking the bar that appears across the top of the page when a web site tries to open a pop-up.

In addition, many toolbars (Yahoo, Google) also include pop-up blockers, so you may need to turn these off (in Internet Explorer use the View --> Toolbars menu option to see which toolbars you have turned on/visible). You can turn off extra toolbars using the same command and then clicking on each toolbar (which causes the check mark to disappear).

Wednesday, April 16, 2008

Joe McNally & "The Moment It Clicks" Redux

If you’re interested in more information about and by Joe McNally, author of The Moment It Clicks (mentioned in yesterday’s posting), check out the “This Week in Photography” (TWIP) podcasts. You can find information at http://twipphoto.com/index.php/archives/282) about Podcast #20 in which Joe discusses his book.

The TWIP blog (http://twipphoto.com/) is a great source of information for anyone interested in photography. Thanks to Bob Epp for the tip.

Tuesday, April 15, 2008

The Moment It Clicks

Joe McNally is variously described as “an internationally acclaimed commercial photographer and long-time photojournalist” and a “legendary magazine photographer.” He describes himself as “LIFE magazine's last staff photographer” (he held that position from 1994 until 1998 when the magazine ceased publication). Joe is among a select group of 10 photographers worldwide to work on the promotion of the upcoming 2008 Olympic Games in Beijing. You may know him from one of his exhibits; a collection of 246 giant Polaroid portraits taken in a three-week period immediately after September 11, 2001 (known as the "Faces of Ground Zero - Giant Polaroid Collection").

Joe was also one of two instructors/guides for the Nikon Photo Safari (pre-conference workshop) that I attended at Photoshop World 2008. He’s a wonderful, energetic instructor. Luckily, he’s also the author of a new book called The Moment It Clicks published by New Riders.

If you’ve ever looked at a photo and had a response somewhere between “what were they thinking?” to “How did they do that?, you’ll find this book fascinating. Often creative artists (photographers included) neither want to give away their techniques nor explain their work. In both respects McNally breaks the mold. Throughout The Moment It Clicks, McNally describes how he shot each image (with lighting, set-up, and equipment tips) and tells the story behind each photo. Among my favorites are changing a light bulb on the top of the Empire State Building (page 3), Joe’s first LIFE magazine cover (something about a green frog, page 19), Tony Bennetts (page 85), Munchkins (page 151), Nanny & Baby (page 199), Napalm Girl (Kim Phuc, page 213) and Her Pope (page 221).

Maybe your library has a copy you can check out?

Monday, April 14, 2008

Digital Photography--Light & Focus

Some of the often repeated axioms from Photoshop World were “If you want to improve your pictures, then take a step closer” and “shadows are a good thing.” The former may have originated with Robert Capa (“If your pictures aren’t good enough, then you aren’t close enough”) or may just be a common refrain from professional photographers. Time and time again, we heard “provide focus for your images” and the best way to do so is to “simplify, simplify, simplify.” In other words, ask yourself what or who is the “subject of this photograph?” Then ask, “What can I do to focus on the subject and simplify distractions?”

Light can help focus or can be the distraction. The eye naturally jumps to the lightest portion of an image. If that “high light” is the subject, you’ve won half the battle. If not, you have work to do.

One web site that received a lot of “press” during the conference was http://strobist.com/ (“strobe” in this context refers to an electronic flash used by photographers to light a scene). The Strobist site focuses on lighting techniques, many of which are aimed at Nikon and Canon users, but if you’re willing to wade through product specific information, you’ll find the site helpful even if you just point and click. Take a look at the drop down lists on the right side of the blog (yes, it’s a blogspot site). Start by clicking the Complete Lighting 101 Archive and select a topic. To give you an example of the non-technical posts that can help an amateur, read http://strobist.blogspot.com/2006/04/on-assignment-thinking-outside-box.html (the “Thinking Outside the Box” post).

Friday, April 11, 2008

From Digital Photography to Adobe Express -- Part I

I just returned from Photoshop World and four days of valuable and intensive sessions on Adobe products (Photoshop CS, Elements, Lightroom, and so on) as well as digital photography. Over the coming days, I’ll share some of the information I gathered.

First, Adobe has released Photoshop Express (see https://www.photoshop.com/express/), a totally online consumer product for storing, editing and sharing your digital photos. Without charge you obtain 2GB of storage space. You also get access to a variety of Photoshop tools that enable you to crop, correct and even “deform” your images. If you wish, you can then create a gallery of images to share on the web. The gallery feature requires Adobe Flash Player 9, but that’s installed automatically with a single click. You also have built-in features to enable you to post/integrate your photos with Facebook, PhotoBucket or Picasa; or to post to your blog.

When editing a photo, you have access to some pretty advanced features (though not with the fine control available in Photoshop) such as white balance, sharpening, cropping, rotating, red-eye removal, saturation, and adding fill light (to name only a few of the 17 controls). When you select a tool, you’re given several visual thumbnails to use to determine the exact settings (e.g. if you add Fill Light, you can select one of the thumbnails to determine how much fill light you want applied). You can also click and hold the View Original button at anytime to see the original version of the image and compare to the changes you’ve made. Express also enables you to drop any changes by deselecting the check box next to the tool/adjustment made. Or, you can click the Reset All button to revert to the original.

It’s probably wise to mention a few caveats.
  1. Depending on your connection speed and network traffic, you’ll just need to go get a cup of coffee each time you open an image.
  2. Photoshop Express is a beta project (if that scares you, don’t go further). This beta seems fully functional and Adobe is asking for feedback before they finalize Photoshop Express.
  3. Keep in mind that you can add captions to your gallery and technically show any image you want; but discretion suggests you should make public only images that do not give away personal information or which could be misused against you or by others.
  4. As always, be aware of college/company policies regarding the disclosure of student/employee, medical and other restricted information (e.g. don’t post an image with a caption disclosing information about someone’s medical condition, student/employment status, and so on).
  5. Be aware of copyright issues. Just because someone posts an image in an Express Gallery (or anywhere on the web) that you like does not give you or anyone else the right to copy, reproduce, distribute or to make a derivative works without permission. Any creative works (photographs are included) are copyright when created, with or without a copyright notice.
  6. Finally, from what I’ve discovered, you can share your “Albums” in your Gallery but you cannot restrict access to only specific users. Once shared, your images are available to anyone on the web.

If you’d like to see a small example of a Gallery, check out http://jbacon.photoshop.com, hover your mouse over the Album icon and click to play the slideshow. When finished, click the Browse button at the top of the screen to view other albums.

Wednesday, April 9, 2008

Anonymous Email

If you receive email from someone you don't recognize (or even if the name sounds familiar) with:
  • no subject line or
  • a subject line that is not descriptive or
  • a subject line written with bad grammar or
  • a nonsensical subject line...

Don't open the email, don't be curious, have no regrets...just delete it!

Thursday, March 27, 2008

You Don't Always Need to Pay Top Dollar

Have you shopped at Sears Outlet or JC Penney’s Outlet stores? Then you know there are good deals to be had. But what about computers? Checkout http://www.dell.com/outlet the Dell Outlet store. If you’re looking for a new system for home, check out the deals. If you see a great buy, add it to your shopping cart, because they do disappear fast (the shopping cart will keep an item reserved for you for up to 15 minutes).
Thanks to Bob Epp and Nick Greenup for this tip.

Wednesday, March 26, 2008

Finding Those Hotspots

Are you traveling soon and needing wireless access for your laptop or handheld device? Go to http://www.jiwire.com/ and in the left margin, indicate your search criterion (try Lahaina, Hawaii) and click the Find Hotspots button. Go down to any of the listed Hotspots. You’ll find 16 hotspots near the center of Lahaina including everything from McDonald’s to Barnes & Noble to Penny’s Place Bed and Breakfast on the list. If you're looking for local wireless Internet connectivity, just list Overland Park or Lenexa or whatever city you wish.

Tuesday, March 11, 2008

No Need to Worry About Obsolete Skills

While my usual practice is to list tips and techniques that help add to your "digital skill bank," there are some skills that you probably do not need to acquire. Just for fun, check out: http://obsoleteskills.com/Skills/Skills.

Saturday, March 1, 2008

Scheduling Meetings in Outlook

There's an easier way to schedule a meeting besides sending multiple email messages to everyone and waiting (hoping) for a response. If all participants are using Outlook and the Outlook Calendar, you can:
  1. Click Calendar.
  2. On the Actions menu, click Plan a Meeting.
  3. Click Add Others, and then click Add from Address Book.
  4. Type the desired name(s) in the Search name field or scroll through the list of names and double-click to add to the Required list of attendees.
  5. For each name entered, by default their attendance is Required, but you can change to Optional (The Required and Optional attendees appear in the To box of the meeting request).
  6. Click a time when all invitees are available. You can use AutoPick Next to find the next available free time for all invitees. If you don't like the first AutoPick time, click AutoPick Next again, and again.
  7. Click Make Meeting to actually schedule the meeting.
  8. In the Subject box, type a description.
  9. If you did not schedule a room, enter the location in the Location box.*
  10. If you want to make the meeting recurring, click Recurrence, and then select the recurrence pattern.
  11. Select any other options you want.
  12. Click Send.

Each invited guest will then receive a meeting request in their email and can accept the invitation, tentatively accept, decline, or suggest a new meeting date and/or time.

*You can also attach the agenda for the meeting either as a separate file or in the text window at the bottom of the Meeting dialog box.

So why are you not using the Meeting Request feature of Outlook?

Thursday, February 28, 2008

Warning, Forward to ALL Your Friends (Not Really!)

Have you ever received an email message about the following?
  • The postcard/greeting card virus or
  • Cell phone directory’s being made available to telemarketers or
  • An email plea to help find Ashley Flores a missing child or
  • A warning about bacteria on lemon wedges in restaurant water or
  • The 809 Area Code Scam or
  • The “Slow Dance” poem message (forward and the American Cancer Society will receive a donation) or
  • The Microsoft/Bill Gates/AOL Giveaway or
  • The ATM reverse PIN (summons police).
Only one is true and another partially true. You can check out http://www.hoax-slayer.com/ or http://www.snopes.com/, but your options for verifying whether an email message is a hoax or a scam are not limited to those two sites. Take a look at http://hoaxbusters.ciac.org/HBOtherHoaxPages.html which lists other Hoax/scam verifying sites...and have fun reading.

Remember, the most prolific SPAM generators are folks who forward untrue email messages warning their friends of impending dangers!

Wednesday, February 27, 2008

I Have an Account with Them?

If you receive email from a firm whose name you recognize (such as Smith Barney, PayPal, First Bank) but you've never done business with them, don't open it, don't be curious, just delete the message--especially if the message is part of a barrage of email messages purportedly from the company.

Monday, February 18, 2008

Disabling AutoCorrect in Microsoft Word 2004 - Mac Version

You can control how AutoCorrect affects you documents from the AutoCorrect dialog box. This is found under Tools, Autocorrect. (Fig. 1).


There are four tabs at the top of this dialog box, AutoCorrect, AutoFormat As You Type, Auto Text, and AutoFormat (Fig. 2). Selecting a tab reveals the available options in the form of check boxes. Check or uncheck a selection to enable or disable it . These changes will remain effective until the next time you change them.


For those who have found the AutoCorrect feature of Word frustrating, it is tempting to just turn everything off. You, of course, may do this, but you run the risk of “throwing the baby out with the bath water”. It is worth taking the time to examine each of these choices to see which options may actually increase productivity for the way you use Word.


It is important that you examine the options under each of the tabs as several are repeated under more than one tab. Disabling one of the many AutoCorrect features may require that you uncheck its box under more than one tab. For example, automatic bulleted lists is an option under both the AutoFormat As You Type and the AutoFormat tabs. If you want this feature disabled, you must uncheck it under both these tabs.

Thanks to Bob Epp for this tip.

Thursday, February 7, 2008

Mini-definitions - Spyware, Adware, and Browser-Hijacking

Language can clarify or confuse. If you don't know the terminology, you're at a disadvantage. Over the past couple of years, there's been a lot of discussion of unwanted, intrusive software. Three terms commonly used are spyware, adware, and browser-hijacking software. Do you know the difference?

Here are mini-definitions of these three aggressive types of software.
  • Adware displays (typically) pop-up ads while you're online. The software tracks and reports your Internet habits ostensibly to tailor ads to your personal needs based on your Internet browsing.
  • Spyware reports information to a third party about your computer system without your knowledge.
  • Browser-hijacking software literally hijacks your computer, slows down your Internet connection (because it is using the bandwidth and your computer's processing for its own purposes), redirects you to advertisers or specific web sites, and changes your browser settings, without your permission or knowledge.

Programs like Symantec Anti-virus, Ad-Aware, Spybot, and Spy Sweeper are designed to try to protect your system from these types of threats.

Tuesday, February 5, 2008

Right Click What?

Want to open up Windows Explorer quickly? Right-click on Start Menu and select Explore.

Typing a letter in Microsoft Word and want to change the font for a word or phrase? Select the text, right-click on the text and select the Font option on the pop-up menu. Try a right-click here and there in any Windows application and explore the context sensitive pop-up menu that appears. You’ll have lots of options without moving your mouse to the Menu or Button Bar.

Friday, February 1, 2008

Expand Your Contacts

Are you getting email from someone you want to add to your Outlook Contacts (so you can find their email address easily)? Just do the following:
  1. Open an email address from the person in Outlook.
  2. Right click (not a left click) the From: field information in the message.
  3. When a pop-up menu appears click Add to Outlook Contacts.
  4. A New Contact form appears with the information derived from the email address. You can enter additional information.
  5. Click the Save and Close button when finished. If you already have a contact form created for this person/business, Outlook will alert you and let you choose which data to save or enable you to update the old record.

This means that next time you want to email to that person, their contact information will be available in your Contacts.

Multiple Windows, Multiple Options

Unwanted pop-up windows can be a pest but you can use this capability (having multiple windows open) to your advantage too. In any version of Windows, you can open multiple occurrences of the same application or have multiple applications running simultaneously. I often see computer users close one application to open another and it's rarely necessary.

Just be aware that you can use the Alt+Tab key combination to jump easily from one open application or window to the next. If you have multiple applications open, hold down the Alt key and press Tab to cycle through those open applications. You'll see a little window appear in the middle of your screen with icons representing each open application. As each is highlighted (by pressing Tab again), you'll see a description of that application (such as "Memo.doc -Microsoft Word" or "Inbox - Microsoft Outlook"). Release the Alt and Tab keys when you highlight the application or window to which you want to jump.

You can also click on one of the tabs on the Task Bar (bottom of the screen) to jump quickly between applications. The tabs are labeled with the name (or an abbreviation) representing the "process" running in that window.

When would you want to run multiple occurrences of the same application? How about if you want to copy files from one location to another without scrolling upon and down a long list of folders? Simply open two occurrences of Microsoft Explorer--one pointed at the source folder and the other at the target folder.

Thursday, January 31, 2008

Save the Trees, Use eDocuments

You know there's no such thing as a paperless meeting, but you can at least avoid printing 15 copies of a handout and then having only 8 people show up. Simply attach any documents (handouts, agenda, etc) to your Meeting Request using Outlook. Then if the participants plan to attend, invite them to bring their own copy. An even better solution is to use a SharePoint site, in which case you can place the document on the SharePoint site in the Shared Documents area and provide all attendees with a URL to the document. The latter method avoids creating digital duplicate copies of the same document (one attached to each message you send) which adds to the workload of the mail server.

Wednesday, January 30, 2008

Get Up to Speed Fast with Word 2007 Tutorial

JCCC will be moving to Office 2007 this Spring (dates yet to be announced) which includes Word 2007. If you’re already using Word 2007 at home, there’s a nice little tutorial demo that you might find helpful. Otherwise, bookmark it and use it later when you want to get up to speed on Word 2007’s basic features:

http://office.microsoft.com/en-us/word/HA100484691033.aspx

Thanks to Tracy Newman for pointing out this online tutorial.

Tuesday, January 29, 2008

How Do You Pronounce That?

Are you not part of the “Hooked on Phonics” generation and sometimes unsure of the correct pronunciation of specific words? Try utilizing http://www.merriam-webster.com/. As an example:
  1. Type (in the Merriam-Webster Online Search text box at the top of the screen): Nevada
  2. Press Enter or click the Search button.
  3. When the word and its definition appears, click the speaker icon that follows the word. Nevada has two icons, meaning there are two acceptable pronunciations, except in Nevada.
  4. Be sure to turn on your speakers.
  5. Click one of the speaker icons and a pop-up window appears. You’ll hear one of the acceptable pronunciations of the word spoken.
  6. Next, click the other speaker icon to hear an alternative pronunciation.

While you’re exploring, select the Medical radio button and type a medical term…for a definition. You’ll also see additional links to related resources.

Friday, January 25, 2008

What Did You Change?

Have you ever received a document from someone and needed to suggest a few changes but were not sure how to highlight the changes for them? In Microsoft Word, you can select the Tools --> Track Changes command (Ctrl+Shift+E). That command works like a toggle. If Track Changes is turned on (Office 2003), you'll see TRK on the status bar at the bottom of the Word window.

Once you've turned on this feature, any changes made to the document are highlighted in a different color (by default red for the first reviewer, blue for the second). So changes you send to others are obvious. Or changes they send to you, if they turn on the Track Revisions feature, are equally obvious.

Thursday, January 24, 2008

Know Your "Subject" Line

When you receive a piece of mail at home, you can usually make some basic assumptions in the blink of an eye about its value and importance. Based on past experience, you can tell if it’s a piece of junk mail or a personal note; a solicitation for yet another credit card or an important bill.

People make those same assumptions when they open their email box and scan all the new arrivals. That’s why, if you want your message to be read, you should effectively use the subject line to clearly identify the topic. Your subject line should be informative and should not be left blank. In fact, if you send or receive a message without a subject line, it’s a prime candidate for deletion. It's always best to make your subject line descriptive of the content of your message.

Wednesday, January 23, 2008

Keyboard Shortcuts

If there are actions you perform repeatedly in one of the Microsoft Office applications or in Microsoft Windows, you can often save considerable time by using a keyboard shortcut, rather than re-positioning the mouse pointer and clicking. Microsoft offers a nice web site with all of the shortcuts listed. Check out: http://www.microsoft.com/athome/moredone/compshortcuts.mspx.

Some of the more common and helpful short cuts include:

  • Ctrl+C to copy selected text
  • Ctrl+X to cut selected text
  • Ctrl+V to paste selected text
  • Ctrl+S to save

Mac users can substitute the Command (Open Apple) key for Ctrl.

Tuesday, January 22, 2008

Accessing a Visual Dictionary

Need to find the right word but don't know where to begin? Try the Visual Dictionary.

http://visual.merriam-webster.com

"The Visual Dictionary is designed to help you find the right word at a glance. Filled with stunning illustrations labeled with accurate terminology in up to six languages, it is the ideal language-learning and vocabulary dictionary for use at school, at home or at work. When you know what something looks like but not what it’s called, or when you know the word but can’t picture the object, The Visual Dictionary has the answer. In a quick look, you can match the word to the image."

Thanks to Nick Greenup for this tip.

Saturday, January 19, 2008

Transfering Files From One Mac to Another Using Firewire

It is easy to transfer information between 2 Macintosh computers using only a firewire connection/cable. To start the connection, boot the first computer (with information you want to transfer or access) by holding down the T key. This boots the computer into firewire transfer mode and flashes a firewire symbol on its screen (to indicate the system is ready to operate in firewire transfer mode). Connect this Macintosh computer using a firewire cable to a second Mac computer. The first Mac computer’s hard drive (e.g., the one in T mode) will show up on the desktop of the second Mac just like any connected drive. Now you can drag and drop files from one Mac to the other. You can also use this procedure to restore a hard drive using a previously saved backup disk image.

Thanks to Bob Epp for this tip.

Wednesday, January 16, 2008

Creating Quizzes & Tests or Educational Games

You don't have to be a Blackboard user to benefit from Respondus (a quiz/test generator) or StudyMate (an educational game generator). JCCC has a campus license for both applications, so the software is available for JCCC faculty & staff use.

If you want to find out more about Respondus and StudyMate, try the following site--maintained by the application developers:
http://www.respondus.com/update/archives.shtml

Are You Using Google Alerts

Did you know that you can have the Google search engine automatically notify you when new information appears on the web? Google Alerts tracks the entire web for the topics you’re personally selected and sends you new results daily by email. For instance, if you are researching "instructional technology" & "mind mapping," you can enter those terms, get an immediate email listing of top sites and then daily receive additional updates by email. Without charge, you can track three different searches terms or topics. If you need additional searches and and more indepth results, there is a subscription fee.

Just go to http://www.googlealert.com/ and sign up.

Monday, January 14, 2008

Response to: Backing Up Your iTunes Library

Just a couple additions from Michael D. Culey - Systems Programmer/Analyst, Johnson County Community College:
  1. Apple supports re-downloading your purchases after a hard drive failure. Go here: http://www.apple.com/support/itunes/store/browser/ and select the category Purchase(s) – missing and the sub-category My hard drive crashed / all of my purchases were erased and then fill out the form. Supposedly they’ll get your music back for you.
  2. iTunes has a built in backup method that’s much easier than doing the whole library folder. Personally, I only backup my iTunes purchases as I can re-rip anything else. If you create a smart playlist that specifies only purchased music, you can then burn that playlist to CD/DVD. (Before you burn, make sure you set iTunes to burn a data disc). You can also put a tag on it that only pulls music added to the library after a specific date. This allows you to backup as you go without having to re-backup your entire library. Of course, this method isn’t a true backup of the iTunes library. You’re merely saving the music files. If you do need to recover this way, you’ll have to import the music off your CDs/DVDs back into iTunes but you won’t lose any important information (unless you care about how many times you’ve played the song or you have spent days and days rating all your music).
  3. In Windows, you do not need third party software to get your music off your iPod back onto your computer (I don’t know about Macs). Basic steps are:
    a. Verify you have double the size of your iPod’s content in free space on your computer.
    b. Turn on the feature that allows you to use your iPod as a portable hard drive.
    c. Allow Windows to see hidden folders.
    d. Browse through the hidden folders on your iPod. There’s once called Music Library or something similar. Just drag that folder to your desktop.
    e. Set iTunes to copy your music to its folders. This places all imported music in the My Music folder.
    f. Set iTunes to keep your music folder organized. This renames all the folders and songs from things like XTYRGRE to whatever the album/artist/song name is.
    g. Disconnect your iPod and then drag that folder into iTunes. This takes a while so be patient.
    h. Once the import is done, delete the folder from your desktop and you should be good to go.

I’ve done this many times and never had any issues with it. Of course, you’ll have to follow this tip at your own risk.

Backing Up Your iTunes Library

If you are using iTunes, you need to be aware that if your hard drive crashes or other catastrophic error occurs, you could lose everything in your iTunes library. While free content can be downloaded again (if it is still available) with only a loss of time and effort, any purchased content from iTunes will be lost. iTunes and Apple are not responsible for your purchased content, and there is no way to replace this content other than re-purchasing it.

As a safeguard against this disaster, you can back up your iTunes library. The process is similar, whether you are using a Mac or a PC. Your iTunes library is simply a folder that contains more folders which in turn contain the files you have downloaded and/or purchased. In a typical installation, there is a folder called iTunes which contains another folder called iTunes Music and a file called iTunes Library. The iTunes Library file is simply a database that stores information about where your music files are located and how you have organized your playlists. Backing up this file will NOT back up your music files! You need to back up the whole iTunes folder to retain all the information currently in iTunes.

Unless you have changed the default location of your iTunes folder, on a PC it should be located within My Documents > My Music. To back up this folder, simply copy the folder called iTunes and either save it to another computer, an external hard drive, or burn it to a DVD if it is small enough to fit. Any time you make new purchases, you should back up these new files as well.

On a Mac, double-click the hard drive icon and go to Music (under Places on the left side of the window). The iTunes folder should default to this location. Back up the iTunes folder to a secure location.

It is also possible to transfer music from your iPod or mp3 device back to iTunes, depending on what device you are using. If you are using an iPod, you will need to purchase third-party software to do this. If you are using an mp3 player, you will need to consult the manual to see if it is possible to move your files back onto your computer. Using your portable device as the sole means of back up, however, is NOT recommended!

Thanks to Tracy Newman for this tip.

Friday, January 11, 2008

Free Online Classes on Digital Photography

Many vendors offer free online training for home and office users. One example is HP Online (http://www.hp.com/). If you go to the HP site, select the Home & Home Office tab (first tab on the left side under the ad banner at the top of the web page) and then select Free Online Classes on the drop-down menu, you’ll end up at http://www.hp.com/united-states/hho/classes/index.html?jumpid=re_R602_mktg/hpcom/split/oc.

Among the offerings are courses on Digital Photography, PC Security Solutions, Digital Entertainment and Home office.

My Blog List