Wednesday, June 25, 2008

Have you every scanned images or text and ended up with numerous separate Adobe PDF (portable document format) files and wanted to merge them into a single PDF file? Or have you ever had an assortment of files (images, Word documents, PDF files, and so on) and wanted to package them together? Well, you can.

Prior to Acrobat Professional 8 you could (and still can) merge a collection of PDF files into a single PDF document. To do so, you can select the Document --> Insert Pages command and in the Select File to Insert dialog box, select the filename of the PDF file from which you want to insert pages. When prompted, you can indicate if you want to insert the pages before or after a given page in the target PDF file.
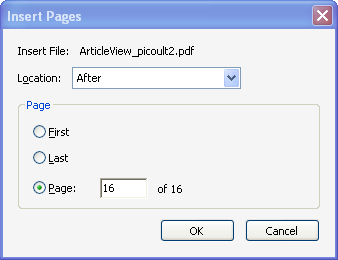


When importing (combining) a large numbers of pages (over 10 or so), a problem occurs where the pages are inserted in reverse order of their file names, no matter what you do. For example, if you have scanned pages and saved them as file01, file 02, file03, and so on; they’ll be inserted in the order file30, file29, file28, and so on.

There is a better way, which also enables you to insert pages in the order you want as well as merge files that are not already in the PDF file format.

The solution is to not use the Document --> Insert Pages command but rather use the Combine Files option from the Tasks toolbar (it resides under the Menu bar and above the File toolbar and is between the Create PDF and Export buttons).
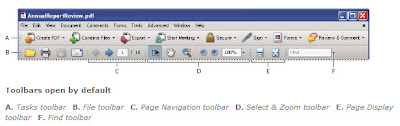

This option enables you to select from any files to which you have access (on your hard drive or a network drive) and then add (import) them in any order you specify. If the files are not already PDF files, Acrobat automatically converts them to the PDF format before merging them into the final PDF package. You can merge Word documents, Excel spreadsheets, graphic images (JPEG, GIF, PNG), as well as PDFs. You also have the option to manually rearrange the files into any order you prefer. You can also choose whether you want a combined document with each file becoming a sequential page in the PDF file or whether you want to save all files separately in a container that uses a single filename.

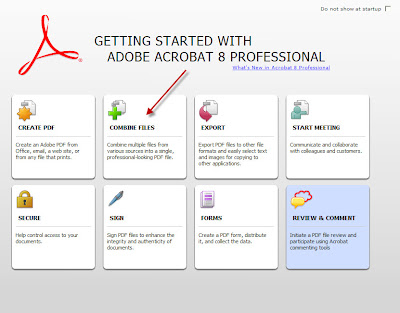
If you want Adobe Acrobat to walk you through the entire process, start up Adobe Acrobat Professional 8. If the Getting Started with Adobe Acrobat Professional 8 wizard is not visible automatically, select the Help --> Getting Started with Adobe Acrobat Professional 8 command. Then select the Combine Files button. You’ll arrive at the same place whether you take this route or simply select the Combine Files button on the Tasks toolbar.
Thanks to Bob Epp for providing the basic research for this tip.

Tuesday, June 24, 2008

Tired of Pre-Approved Credit Card Junk Mail?

You can go to www.optoutprescreen.com (or call 1-888-5-OPT-OUT) to help reduce the number of those pre-approved credit card junk mail letters you receive. Don’t expect overnight results, but I did this several months ago and the number of pre-approved offers has definitely diminished. Now, if we could just opt out of SPAM!

Monday, June 23, 2008

How Small Can You Make a Camcorder?

Digital Camcorders are getting smaller and the prices are dropping. That seems to be the general story of all technology. I’ve recently tested a Flip Video Ultra camcorder (see http://www.theflip.com/products.shtml) and found it wonderfully small (fits in a shirt pocket). It’s lightweight too. It records video on internal memory rather than on a miniDV tape. The Flip Video Ultra can record 60 minutes of video using 2GB of internal memory (the Ultra has 2GB while the regular Flip Video has 1GB). Note, the newest addition to the Flip Video family is a 2GB Flip Mino. It’s much like the Ultra except it includes an internal Lithium-Ion rechargeable battery capable of 4 hours recording between charges. It retails for $179.99.

I was pretty impressed with the 640x480 resolution image from the $149 camera, until I ran across the AIPTEK A-HD 720P digital camcorder (see http://www.aiptek.com/Merchant2/merchant.mvc?Screen=PROD&Product_Code=R-AHDB&Category_Code=DC1&Store_Code=AS) which retails at $159.99 (as low as $139.99 refurbished). While the A-HD 720P doesn’t have a snappy name (like Flip Video Ultra), it does provide high definition (HD) video recording (1280x720 using H.264 video compression) and is also an 8 megapixel still image camera and media player all rolled into one. The video you capture can be played on a high definition TV, standard TV, PC or Mac (cables are included) and enables you to record direct from a TV set as well. Some of the other significant differences include a rechargeable 1000mA Li-ion battery good for about 4 hours of recording (the Flip Video Ultra uses 2 AA batteries that give you approximately 2 hours of recording time) and the ability to use up to an 8GB SD card (the Flip Video Ultra’s memory is not expandable). The bad news is that the A-HD 720P does not come with an SD memory card, so you must buy one or you don’t have sufficient memory to record video (it comes with only 6MB internal memory). So effectively, the cost of the camcorder is $12 to $30 more than it seems. The following chart indicates how much video recording time or how many images you can store based on the SD card size and the resolution of the images/video you capture.


One negative to the A-HD 720P is it’s a bit heavier than the 5.2 oz Flip Video Ultra (can’t find an exact weight in the specs).

The A-HD video files are compressed (stored in the QuickTime .MOV format using H.264 video compression) while the Flip Video Ultra uses Pure Digital Video Engine 2.5 to compress in .AVI format. With both camcorders, it takes some practice to steady the camera and adjust the zoom (both units employ a 2x digital zoom).

Prices listed above are list and can be “beat” at http://www.amazon.com/ and other vendors. There are accessories available for both camcorders (tripods, and so on). Either choice is a giant step forward in miniaturization and price reduction.

Thursday, June 19, 2008

No Free Lunch @ Adobe Until July 1

Bob Epp, Sr. Analyst in the Ed Tech Center, alerted me to the fact that some of his Photoshop students wanted to download a trial version of Photoshop (typically good for 30 days) and found that the trial downloads (http://www.adobe.com/downloads/) are unavailable until July 1. This appears to be the case with allk Adobe trial downloads, not just Photoshop. Here is the explanation from Adobe:

During the month of June 2008, certain product trials that are launched for the first time (regardless of when they were installed) will function for only one day instead of 30 days, due to an error in a line of code that counts down the remaining days in a trial. You will not experience this issue if you have launched your trial before June 1, 2008, or do not launch it until July 1 or thereafter.

We understand that trials are an important tool to experience the new features of a product. However, this issue would have resulted in a frustrating situation for a large number of customers — an experience that just does not meet the high standards we have set for all of our products and solutions. We invite you to explore the other resources available on Adobe.com in order to experience the products in action.

While we’re discussing Adobe products, I mentioned Adobe Express in an earlier post. Christopher Boyce of the UMKC School of Medicine (Kansas City, MO) subsequently shared the following information with me:

I just wanted to mention a note about Photoshop Express, which you may already know - Adobe's terms of use: https://www.photoshop.com/express/terms.html

They have already revised it recently, due to negative feedback from their original terms, but there is still these particular terms which may not sit well with some users:

"8. Use of Your Content.

Adobe does not claim ownership of Your Content. However, with respect to Your Content that you submit or make available for inclusion on publicly accessible areas of the Services, and unless otherwise specifically agreed in any Additional Terms that might accompany individual services (such as Photoshop.com/Express), you grant Adobe a worldwide, royalty-free, nonexclusive, perpetual, irrevocable, and fully sublicensable license to use, distribute, reproduce, modify, adapt, publish, translate, publicly perform and publicly display such Content (in whole or in part) and to incorporate such Content into other Materials or works in any format or medium now known or later developed."

and

"10. Right to Derive Revenue/Advertisements.

You agree that Adobe may derive revenue and or other remuneration from the Services including from portions of the Services that include Your Content.
For example, Adobe may display Adobe and/or third party paid advertisements and other information adjacent to or included with the Services and adjacent to or in connection with Your Content, and you agree that you are not entitled to any compensation for any such advertisements. The manner, mode and extent of advertising or other revenue generating models by Adobe on or in conjunction with the Services are subject to change without specific notice to you."

...I just wanted to pass this along.

So, “buyer (or freebie user) beware.”

Wednesday, June 18, 2008

Information Please!

Nick Greenup, Sr. Analyst in the Ed Tech Center, recently shared this information with me. When Nick receives a new phone book, he slices out the coupon pages, staples them together and discards the rest of the book. With directory assistance and the Internet there’s no need to keep a bulky set of yellow pages around. Here are the ways Nick accesses the information he needs.

For residential, business, and "reverse" look up use: http://www.anywho.com. Reverse lookup is when you know the phone number and want to find out to whom it belongs. Try looking up your own information and you’ll see what’s available to anyone on the web. Helpful and scary.

When www.Anywho.com fails to locate a desired business or contact, try a Google Maps search (http://maps.google.com). Notice the Find Businesses tab at the top. You can be very general or specific with your search. For instance, try “colleges” in the What field and “Overland Park” in the Where field. You’ll see all the local educational options. Nick points out that you can also talk to Google Maps like a buddy instead of a computer program; e.g., type "pizza in overland park" or "lunch Westport" and you’ll see surprisingly good results including a list of findings and a map view with all contact info (often a picture or street view of the business too). You can also get driving directions using Google Maps.

Suppose you are not at your computer, then what? Call 1411 and pay up to $3.50 per call? No way! Try Goog411, by calling toll free 1-800-GOOG-411 (1-800-466-4411). Check out the YouTube video http://www.google.com/goog411/ for more details. There is no charge for the service and they will connect you to the desired number without charge too. If using a cell phone you can say "text message" and Google will text you the business details. If you have a phone with Internet access you can say map it and view a map/directions!

These options should cover all your “information” needs, but there’s still one more option. It’s not new, does include ads, but it’s also free. This company holds the patent for free ad-based 411 information. Simply call 800-Free-411. If you have a Skype account add the contact "FREE411USA" and when you call it using Skype you’ll be connected to the service. Nick also mentioned that “Microsoft and AT&T are also running a free 411, but I haven't tried them.”

Tuesday, June 17, 2008

Plethora of Web 2.0 Tools

Back in March 2008, I presented a workshop session called "The Instructor's Digital Toolkit: A Show & Tell Session" (at the Kansas City Professional Development Council Conference at Ottawa University). In the session I attempted to focus on the question “What tools are available to instructors with which to develop instructional materials or that might enhance the presentation of instructional materials?” Many of these tools (but not all) are part of the plethora of Web 2.0 applications. The selection of instructional tools is far greater than the typical blog, wiki, and social bookmarking apps that are commonly discussed. To illustrate the range of tools, I developed a mind map (http://www.mindomo.com/view?m=38c41ea842988eb5177861fc90f77e46) and included it in the presentation. The mind map has since been enlarged and I continue to add new apps as I hear about them (and have time to update the mind map).

When using the mind map, hover your mouse pointer over each note icon to see related text, click the globe icon to jump to the website for the application, click the "+" sign to expand and display subtopics or (if already displayed) click the "-" sign to contract and hide subtopics. In a few cases, you can expand the mind map beyond the listing of apps to display instructional examples. If you have comments or additions to the listings, please email me at (jbacon@jccc.edu).

It’s probably worth noting that many colleges (like JCCC where I work) offer in-house equivalents to many of these tools (e.g., Blackboard and Angel include blog and wiki tools, SharePoint is a collaboration tool), so many of these applications may not be supported by your college (or your company for that matter).

Monday, June 16, 2008

"You're Killing Me" said the Flash Drive

A number of reasons exist for flash drives (sometimes called pen drives) to go bad. Obviously, physical abuse of the flash drive, manufacturing errors and the like can contribute, but I’ve never had a flash drive fail. I suspect that one common mistake can greatly increase the chances of failure. If you do not disengage the flash drive properly it can contribute to the failure rate.

The proper procedure is to use the Windows "Safely remove hardware" process listed on the Windows task bar. The task bar icon looks link a small green arrow (pointing to the left and downward) which hovers over a gray rectangular object. If you remove your flash drive or other storage device without first using this feature and your system is writing files (temporary or otherwise) to the flash drive, you can corrupt the files being written which can subsequently cause the pen drive to fail.

Thursday, June 12, 2008

What is Web 2.0

Nowadays, you’ll frequently hear the term Web 2.0 or Web 2.0 apps (applications). It’s a term that’s several years old and refers to the second generation of the web (some say we’re already into Web 3.0 or Web 3D, but that discussion is for another day). If you’re curious, checkout a slideshow I put together last Summer for the Powerful Professional Conference hosted by Johnson County Community College available at http://www.slideshare.net/jbacon/personal-professional-uses-of-web-20-tools. The second slide says most of what you need to know.

In essence, Web 1.0 was a “one way street” (web publishers sent you information they wanted and publishing was restricted to those who knew the language (HTML) and had the tools (HTML editors, servers, access rights). Web 2.0, on the other hand, is participatory. Anyone with web access (a browser) has the ability to publish, contribute, comment and co-author. Tools such as wikis, blogs, and social networking apps are the epitome of Web 2.0. They provide for the “harnessing of collective intelligence” (e.g., we all contribute and the product is better, more accurate and more accessible because it is democratic, self-checked and above all else participatory.

Another way to summarize the shift from Web 1.0 to 2.0 is covered by slides 4-7 of the slideshow at http://www.slideshare.net/anantshri/web20-an-introduction-396686. By the way, http://www.slideshare.net/ site is another example of a Web 2.0 participatory, web-based application.

In upcoming tips, I’ll discuss Web 2.0 apps in more detail. You also have an opportunity to learn more at the upcoming Summer Institute on Distance Learning and instructional Technology (SIDLIT) hosted by the Colleague to Colleague organization and Johnson County Community College on Thursday, July 31 and Friday, August 1, 2008. For more information, a schedule of sessions and to register for the free conference, check out http://web.jccc.net/c2c/sidlit/.

Wednesday, June 4, 2008

Worldwide Telescope from Microsoft Research

I don’t pretend to be even an amateur astronomer, but found the Worldwide Telescope (WWT) released by Microsoft Research a fascinating application (see http://www.worldwidetelescope.org/experienceIt/ExperienceIt.aspx). In knowledgeable hands, it would have a clear educational use. Simply from a curiosity standpoint, it’s a fascinating tool that enables you to see black holes, colliding galaxies and the birth of new stars.

After you download the 20.2 MB installer, run the installer (instructions are available at http://www.worldwidetelescope.org/experienceIt/ExperienceIt.aspx?exp=true) and start up the application (it’ll appear on your Start menu), your next step should be to click the Guided Tours link (top left of the screen) and run the “Learning WWT” tour. It’ll give you a quick overview of how to navigate and get the most out of WWT (e.g., use your right mouse button for more information on any “heavenly body,” use the scroll wheel or Page Up and Page Down keys to zoom in or out from an image, click and drag on the star field background to change your view or use the arrow keys to navigate, and so on).

The WWT is considered a “Web 2.0 visualization software” tool that enables your computer to become a virtual telescope. It is a collaborative work because educators and scientists have compiled the images from multiple sources and created guided tools. You, in turn can collaborate, by adding your comments when you complete a tour.

In Microsoft’s verbiage, “WWT is a single rich application portal that blends terabytes of images, information, and stories from multiple sources over the Internet into a seamless, immersive, rich media experience. Kids of all ages will feel empowered to explore and understand the universe with its simple and powerful user interface. “Microsoft Research is dedicating Worldwide Telescope to the memory of Jim Gray and is releasing WWT as a free resource to the astronomy and education communities with the hope that it will inspire and empower people to explore and understand the universe like never before.”

Tuesday, June 3, 2008

SpyWare and Your Home Computer

If your home computer seems to be running slower, you're seeing pop-up windows you didn't invite and you can no longer access web sites that you previously could browse, here's a prescription for your sick computer.

  • Be sure you have a firewall installed (Windows XP Service Pack 2 includes a built-in firewall).
  • Be sure you are running anti-virus software with the most up-to-date virus definitions available.
  • Be sure you are running adware/spyware protection.

One option is Ad-aware SE Personal (free) which is designed to provide "protection from known Data-mining, aggressive advertising, Parasites, Scumware, selected traditional Trojans, Dialers, Malware, Browser hijackers, and tracking components."

To locate, go to http://www.lavasoftusa.com/software/adaware/ and click on the "Download Ad-aware here" button on the right.

Or you can find the software on http://www.download.com/ at http://www.download.com/3000-2144-10045910.html?part=69274&subj=dlpage&tag=button

Ad-aware is one of the first applications built to find and remove adware and spyware. It has the ability to scan your RAM, registry, hard drives, and external storage devices for known data-mining, advertising, and tracking components. This application cleans your system and provides a higher degree of privacy (and more efficient computing) while you surf the Web.
Ad-Aware SE Personal Edition can also scan for known and unknown/possible browser hijackers.

NOTE: Ad-aware is NOT free for commercial or business purposes.

Monday, June 2, 2008

Pop-up Blockers

If you have Microsoft Windows Service Pack 2 (SP2) installed, the service pack automatically adds a pop-up blocker (and turns it on) that can interfere with accessing certain web sites such as the Web Outlook page (owa.jccc.edu), and many web based tools such as Blackboard (either a learning managemnet system). You can turn off the pop-up blocker, using the Tools --> Pop-up Blocker --> Turn Off Pop-up Blocker command, but a better option is to leave it turned “on” and exempt certain sites.

To exempt specific sites select the Tools --> Pop-up Blocker --> Pop-up Blocker Settings command. When you select this command, you can type in the URL to exempt and click the Add button. Then click Close when done adding sites to exempt. By the way, you can also exempt sites on the fly by clicking the bar that appears across the top of the page when a web site tries to open a pop-up.

In addition, many toolbars (Yahoo, Google) also include pop-up blockers, so you may need to turn these off (in Internet Explorer use the View --> Toolbars menu option to see which toolbars you have turned on/visible). You can turn off extra toolbars using the same command and then clicking on each toolbar (which causes the check mark to disappear).

Wednesday, April 16, 2008

Joe McNally & "The Moment It Clicks" Redux

If you’re interested in more information about and by Joe McNally, author of The Moment It Clicks (mentioned in yesterday’s posting), check out the “This Week in Photography” (TWIP) podcasts. You can find information at http://twipphoto.com/index.php/archives/282) about Podcast #20 in which Joe discusses his book.

The TWIP blog (http://twipphoto.com/) is a great source of information for anyone interested in photography. Thanks to Bob Epp for the tip.

Tuesday, April 15, 2008

The Moment It Clicks

Joe McNally is variously described as “an internationally acclaimed commercial photographer and long-time photojournalist” and a “legendary magazine photographer.” He describes himself as “LIFE magazine's last staff photographer” (he held that position from 1994 until 1998 when the magazine ceased publication). Joe is among a select group of 10 photographers worldwide to work on the promotion of the upcoming 2008 Olympic Games in Beijing. You may know him from one of his exhibits; a collection of 246 giant Polaroid portraits taken in a three-week period immediately after September 11, 2001 (known as the "Faces of Ground Zero - Giant Polaroid Collection").

Joe was also one of two instructors/guides for the Nikon Photo Safari (pre-conference workshop) that I attended at Photoshop World 2008. He’s a wonderful, energetic instructor. Luckily, he’s also the author of a new book called The Moment It Clicks published by New Riders.

If you’ve ever looked at a photo and had a response somewhere between “what were they thinking?” to “How did they do that?, you’ll find this book fascinating. Often creative artists (photographers included) neither want to give away their techniques nor explain their work. In both respects McNally breaks the mold. Throughout The Moment It Clicks, McNally describes how he shot each image (with lighting, set-up, and equipment tips) and tells the story behind each photo. Among my favorites are changing a light bulb on the top of the Empire State Building (page 3), Joe’s first LIFE magazine cover (something about a green frog, page 19), Tony Bennetts (page 85), Munchkins (page 151), Nanny & Baby (page 199), Napalm Girl (Kim Phuc, page 213) and Her Pope (page 221).

Maybe your library has a copy you can check out?

Monday, April 14, 2008

Digital Photography--Light & Focus

Some of the often repeated axioms from Photoshop World were “If you want to improve your pictures, then take a step closer” and “shadows are a good thing.” The former may have originated with Robert Capa (“If your pictures aren’t good enough, then you aren’t close enough”) or may just be a common refrain from professional photographers. Time and time again, we heard “provide focus for your images” and the best way to do so is to “simplify, simplify, simplify.” In other words, ask yourself what or who is the “subject of this photograph?” Then ask, “What can I do to focus on the subject and simplify distractions?”

Light can help focus or can be the distraction. The eye naturally jumps to the lightest portion of an image. If that “high light” is the subject, you’ve won half the battle. If not, you have work to do.

One web site that received a lot of “press” during the conference was http://strobist.com/ (“strobe” in this context refers to an electronic flash used by photographers to light a scene). The Strobist site focuses on lighting techniques, many of which are aimed at Nikon and Canon users, but if you’re willing to wade through product specific information, you’ll find the site helpful even if you just point and click. Take a look at the drop down lists on the right side of the blog (yes, it’s a blogspot site). Start by clicking the Complete Lighting 101 Archive and select a topic. To give you an example of the non-technical posts that can help an amateur, read http://strobist.blogspot.com/2006/04/on-assignment-thinking-outside-box.html (the “Thinking Outside the Box” post).

Friday, April 11, 2008

From Digital Photography to Adobe Express -- Part I

I just returned from Photoshop World and four days of valuable and intensive sessions on Adobe products (Photoshop CS, Elements, Lightroom, and so on) as well as digital photography. Over the coming days, I’ll share some of the information I gathered.

First, Adobe has released Photoshop Express (see https://www.photoshop.com/express/), a totally online consumer product for storing, editing and sharing your digital photos. Without charge you obtain 2GB of storage space. You also get access to a variety of Photoshop tools that enable you to crop, correct and even “deform” your images. If you wish, you can then create a gallery of images to share on the web. The gallery feature requires Adobe Flash Player 9, but that’s installed automatically with a single click. You also have built-in features to enable you to post/integrate your photos with Facebook, PhotoBucket or Picasa; or to post to your blog.

When editing a photo, you have access to some pretty advanced features (though not with the fine control available in Photoshop) such as white balance, sharpening, cropping, rotating, red-eye removal, saturation, and adding fill light (to name only a few of the 17 controls). When you select a tool, you’re given several visual thumbnails to use to determine the exact settings (e.g. if you add Fill Light, you can select one of the thumbnails to determine how much fill light you want applied). You can also click and hold the View Original button at anytime to see the original version of the image and compare to the changes you’ve made. Express also enables you to drop any changes by deselecting the check box next to the tool/adjustment made. Or, you can click the Reset All button to revert to the original.

It’s probably wise to mention a few caveats.
  1. Depending on your connection speed and network traffic, you’ll just need to go get a cup of coffee each time you open an image.
  2. Photoshop Express is a beta project (if that scares you, don’t go further). This beta seems fully functional and Adobe is asking for feedback before they finalize Photoshop Express.
  3. Keep in mind that you can add captions to your gallery and technically show any image you want; but discretion suggests you should make public only images that do not give away personal information or which could be misused against you or by others.
  4. As always, be aware of college/company policies regarding the disclosure of student/employee, medical and other restricted information (e.g. don’t post an image with a caption disclosing information about someone’s medical condition, student/employment status, and so on).
  5. Be aware of copyright issues. Just because someone posts an image in an Express Gallery (or anywhere on the web) that you like does not give you or anyone else the right to copy, reproduce, distribute or to make a derivative works without permission. Any creative works (photographs are included) are copyright when created, with or without a copyright notice.
  6. Finally, from what I’ve discovered, you can share your “Albums” in your Gallery but you cannot restrict access to only specific users. Once shared, your images are available to anyone on the web.

If you’d like to see a small example of a Gallery, check out http://jbacon.photoshop.com, hover your mouse over the Album icon and click to play the slideshow. When finished, click the Browse button at the top of the screen to view other albums.

Wednesday, April 9, 2008

Anonymous Email

If you receive email from someone you don't recognize (or even if the name sounds familiar) with:
  • no subject line or
  • a subject line that is not descriptive or
  • a subject line written with bad grammar or
  • a nonsensical subject line...

Don't open the email, don't be curious, have no regrets...just delete it!

Thursday, March 27, 2008

You Don't Always Need to Pay Top Dollar

Have you shopped at Sears Outlet or JC Penney’s Outlet stores? Then you know there are good deals to be had. But what about computers? Checkout http://www.dell.com/outlet the Dell Outlet store. If you’re looking for a new system for home, check out the deals. If you see a great buy, add it to your shopping cart, because they do disappear fast (the shopping cart will keep an item reserved for you for up to 15 minutes).
Thanks to Bob Epp and Nick Greenup for this tip.

Wednesday, March 26, 2008

Finding Those Hotspots

Are you traveling soon and needing wireless access for your laptop or handheld device? Go to http://www.jiwire.com/ and in the left margin, indicate your search criterion (try Lahaina, Hawaii) and click the Find Hotspots button. Go down to any of the listed Hotspots. You’ll find 16 hotspots near the center of Lahaina including everything from McDonald’s to Barnes & Noble to Penny’s Place Bed and Breakfast on the list. If you're looking for local wireless Internet connectivity, just list Overland Park or Lenexa or whatever city you wish.

Tuesday, March 11, 2008

No Need to Worry About Obsolete Skills

While my usual practice is to list tips and techniques that help add to your "digital skill bank," there are some skills that you probably do not need to acquire. Just for fun, check out: http://obsoleteskills.com/Skills/Skills.

Saturday, March 1, 2008

Scheduling Meetings in Outlook

There's an easier way to schedule a meeting besides sending multiple email messages to everyone and waiting (hoping) for a response. If all participants are using Outlook and the Outlook Calendar, you can:
  1. Click Calendar.
  2. On the Actions menu, click Plan a Meeting.
  3. Click Add Others, and then click Add from Address Book.
  4. Type the desired name(s) in the Search name field or scroll through the list of names and double-click to add to the Required list of attendees.
  5. For each name entered, by default their attendance is Required, but you can change to Optional (The Required and Optional attendees appear in the To box of the meeting request).
  6. Click a time when all invitees are available. You can use AutoPick Next to find the next available free time for all invitees. If you don't like the first AutoPick time, click AutoPick Next again, and again.
  7. Click Make Meeting to actually schedule the meeting.
  8. In the Subject box, type a description.
  9. If you did not schedule a room, enter the location in the Location box.*
  10. If you want to make the meeting recurring, click Recurrence, and then select the recurrence pattern.
  11. Select any other options you want.
  12. Click Send.

Each invited guest will then receive a meeting request in their email and can accept the invitation, tentatively accept, decline, or suggest a new meeting date and/or time.

*You can also attach the agenda for the meeting either as a separate file or in the text window at the bottom of the Meeting dialog box.

So why are you not using the Meeting Request feature of Outlook?

My Blog List